Table of Contents
For Your Members
Registering and Logging In
Replicating Websites
Technical Support
For You the Team Administrator
Pointing Your Domain Name
System Logins
Leadership Support
Sales Process Flow Chart
Understanding the follow-up process so you can write great email campaigns
Overview of your Sales Process and the Psychology behind it
How the Lists and Statuses Work in Home Office Pro
Lists in Home Office Pro
Statuses in Home Office Pro
Outcomes (prospecting)
Understanding How Outcomes Work
What happens when you connect with a Prospect
What happens when you DO NOT connect with a Prospect
Customizing the Emails in your System
Customizing your Instant Emails
Example of an Instant Email
Customizing your Auto Responders in Response Magic
Response Magic Replacement Variables
Sample Auto responder Email in Response Magic
How to add warm market approach emails
Capture Pages
Creating your Front-end Lead Capture Pages
How to add a list for all your members
Defining your Website Settings
Modifying each page of your Marketing Website
Getting Started Checklist and Team Center Content
Adding Team Center Resource Pages
Adding Getting Started Pages
Additional modules
How to set up a multiple opportunity affiliate system with HomeOfficePro
The Basics of Home Office Pro -For Your Members
Registering and Logging In
Each Member of your team will have the ability to purchase their own personalized account with your system at the rate of $29.95 per/mo by visiting the registration page located right off your main domain name. From this page they can register by clicking on the ![]() button or be able to login in by clicking the link
button or be able to login in by clicking the link![]() .
.
Replicating Websites
Each paying member of the system will get to choose their own username.
This username not only lets them log in, but it will also act as their website
username for example: https://www.yourdomain.com/username
Technical Support
All paying members have full access to the technical support center at https://support.platinumsynergy.com/ or support can be also obtained by emailing support@platinumsynergy.com
For You the Team Administrator
Pointing Your Domain Name
Before the installation or when adding a new domain name you will be required to set your domain name to point to our DNS (domain name servers)
the domain name servers can be updated at your domain name provider. Contact your domain name provider to get instructions on how to change DNS via your domain name user panel.
Domain name server that need to be set are as follows:
ns1.platinumdesigns.net
ns2.platinumdesigns.net
System Logins
At the time of site launch you will be given two specific logins.
1) The Admin Login to your Members Area which can be used at
https://www.yourdomain.com/members
2) The Admin Pane lLogin which can be used at
https://admin.platinumsynergy.com
3) How to retrieve you website FTP information (for experienced designers)
-Login to your members area as the admin https://www.yourdomain.com/members
-Click My Settings
-Click admin settings
-Custom marketing websites (it will be at the bottom of this page)
also see: How to create custom websites for HomeOfficePro (for experienced designers/developers)
Leadership Support
As the leader you have access to higher level support for your website you may email support@platinumsynergy.com with questions regarding your site set up and configuration ( Leadership Support is handled as a priority ).
Sales Process Flowchart
Overview of your Sales Process and the Psychology behind it.
How the Lists and Statues Work in Home Office Pro
Lists are a pre-determined campaign that sends automatic emails to the prospect based on the time they were added to the list. Email will automatically go out on behalf of the account owner to the prospect based on this set of pre-determined follow up emails. Some lists do not have any emails and therefore no follow-ups will take place when a prospect is in that list.
Status defines what stage the prospect is in the sales cycle. It also determines what tab the contact shows up in when using the contact manager. Prospects can change status so they can be easily identified in the contact manager without changing their list
Lists in Home Office Pro:
Some lists can have auto-responders attached, which will send a series of timed emails out to the prospects over time.
Lists will synchronize automatically with the built-in auto responder account with Response Magic
( Customizing your Auto responders in Response Magic )
Here is a list of the 8 lists which are in your system:
1) Warm Market Prospects The default list for manually entered leads The goal of this sequence is to act as a holding tank with no automatic email until you attempt to set up your first exposure
2) Business Prospects Where business opportunity prospects are entered. The goal of this sequence is to act as a holding tank with no automatic email until you attempt to set up your first exposure
3) Product Prospects Where product focused prospects are entered, The goal of this sequence is to act as a holding tank with no automatic email until you attempt to set up your first exposure
4) Purchased Leads Where the lead providers will place leads by default The goal of this sequence is to act as a holding tank with no automatic email until you attempt to set up your first exposure
5) Disqualified Where prospects go that you are disqualify before they get all the information about the business, The goal of this sequence it to peak their interest about the benefits of the industry so they want to contact you to see the presentation.
6) No For Now Drip List An Auto-responder List which follows up with people who have seen the information about the business but are not interested right now. We all know timing changes in peoples lives so the goal of this auto- responder campaign is to slowly drip content re-kindles the interest of your No for Now Prospect Example: success stories, testimonials and simple how to guides of how the success stories accomplished their goals.)
7) Customers A container list which will store all contacts who have become customers of yours. The goal of this email auto-responder sequence is to subtly remind the customers they can build the business by showcasing success stories, easy how to build the business guides, proof of success and testimonials.
8) Business Builders A container list which will store all Business Builders who have enrolled with you. The goal of this email auto-responder sequence is to inspire, encourage and motivate your team to stay focused on the critical activities that create results in your business.)
- Orange signifies Lists that are used typically for just holding leads, no autoresponders
- Dark Blue Lists are used for sending out Auto responders to the type of lead/prospect
- Light Blue Lists are for Contacts who have enrolled as business builders or customers ( you can add auto-responders in these lists for training if you wish ).
- Red Lists are for contacts who you have disqualified
Statuses in Home Office Pro:
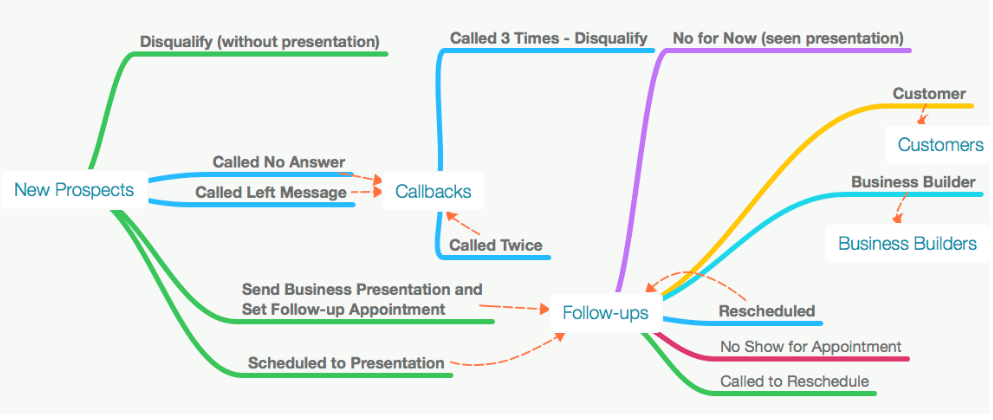
Home Office Pro comes pre-set with a variety of statuses, which come into play through out the system. Statuses will determine where a prospect is within the sales funnel. These are different than lists because statuses not only display where the prospect is at in the sales funnel but status also determine what tabs the prospects show up under and what outcomes are displayed.
Here is a list of the pre-set statuses for your Home Office Pro system:
|
Warm Market Prospect |
Prospect entered manually or through wizard as Warm Market |
|
Business Prospect |
A prospect coming through your business opportunity funnel. (this is the default status for your funnel ) |
|
Product Prospect |
A prospect coming through a created product focused funnel |
|
Purchased Lead |
A lead purchased through an approved vendor |
|
Called No Answer |
A prospect who was called once but no answer |
|
Called Left Message |
A prospect who was called once and left a message |
|
Called Twice |
A prospect who was called a second time |
|
Disqualified |
A prospect who you no longer wish to contact at all and who has not seen a presentation |
|
Customer |
A contact who has enrolled as a customer |
|
Business Builder |
A contact who has enrolled as a Business Builder |
|
Scheduled Presentation |
A prospect who you have scheduled to a presentation |
|
Sent Information set Appointment |
A prospect whom you have send additional information to regarding your business |
|
No for Now ( Seen Presentation ) |
A prospect who is not interested now, but has seen a presentation but will continue to receive auto-responders (Different than Disqualified) |
|
Rescheduled |
A prospect who you have called and rescheduled an appointment for another time. |
|
Called to Reschedule |
A prospect that you called to reschedule after they did not show for your presentation. |
|
Couldn’t Reschedule |
A prospect that you called a second time to reschedule your presentation but could not connect with. |
|
No Show for Appointment |
A prospect that did not show up for your scheduled presentation. |
Outcomes
Understanding How Outcomes Work
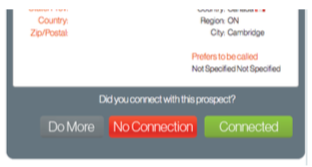
Outcomes are easy click buttons which members can use to tell the system the outcome of their phone call.
Outcomes are broken up in to “Connected” and “No Connection” represented by two buttons at the bottom of the contact popup:
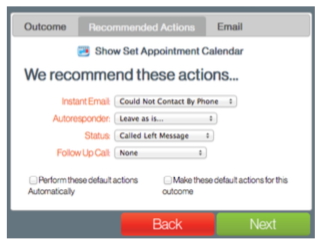 Outcomes will recommend the next actions the member should take with the Prospect, then fulfill the actions automatically.
Outcomes can change the Prospects: Status, List, Book a follow up call or presentation, and send an Instant template email to the prospect.
By changing the Status and/or List of the prospect, it will move them to the next stage of the sales funnel.
What happens when you connect with a Prospect
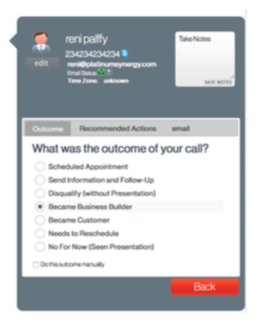
When you select the Connected Button letting the system know you have a prospect on the line you will have the options to choose from the pre-set Connected Outcomes:
When you select the Connected Button letting the system know you have a prospect on the line you will have the options to choose from the pre-set Connected Outcomes:
When you get a hold of the prospect you select “Connected” the popup will give you the options below:
Here is what happens in each potential Connected Outcome:
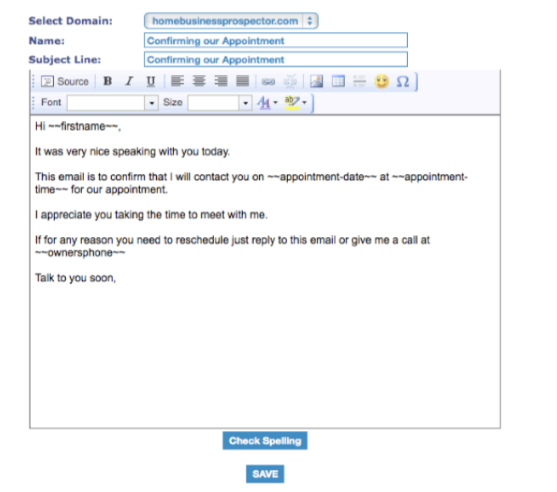
Scheduled Appointment
Email: Confirming Our Appointment
List: Leave as is..
Status: Scheduled Appointment
* Automatically pops up calendar for scheduling
Send Business Presentation and Set Follow-up Appointment
Email: Sent Information Email
List: Leave as is..
Status: Sent Information with Appointment
* Automatically pops up calendar for scheduling
Disqualify ( without Presentation )
Email: No Instant Email
List: Disqualified
Status: Disqualified
Became Business Builder
Email: Business Builder Email
List: Business Builders
Status: Business Builder
* Automatically pops up calendar for scheduling training/follow-up
Became Customer
Email: Welcome Customer
List: Customers
Status: Customer
* Automatically pops up calendar for scheduling follow up to upsell to the business or to make sure that they place their order/auto ship
Needs to Reschedule
Email: Confirming our Appointment
List: Leave as is…
Status: Rescheduled
* Automatically pops up calendar for rescheduling the call
No For Now ( Seen Presentation )
Email: No For Now Email
List: No For Now Drip List
Status: No For Now ( Seen Presentation )
What happens when you DO NOT connect with a Prospect
Here is what happens in each potential No Connection Outcome:
Called Left Message
Email: Could Not Contact By Phone
List: Leave as is…
Status: Called Left Message
Called No Answer
Email: Could Not Contact By Phone
List: Leave as is…
Status: Called No Answer
Called Second Time
Email: Could Not Contact By Phone
List: Leave as is…
Status: Called Twice
Called Three Times – Disqualify
Email: No Instant Email
List: Disqualified
Status: Called 3 Times – Disqualify
No Show for Appointment
Email: Missed Appointment
List: Leave as is..
Status: No Show for Appointment
Called to Reschedule
Email: Called to Reschedule
List: Leave as is..
Status: Called to Reschedule
Couldn’t Reschedule
Email: Couldn’t Reschedule
List: Disqualified
Status: Disqualified
Customizing the Emails in your System
Customizing your Instant Emails
There are two different types of emails that are sent out by Home Office Pro.
Instant Emails that are sent based around an outcome at the exact time you are communicating with your prospect.
Auto responder Emails are set to go out over time to drip on your prospects. Both types of emails can be customized for your system and in the case of Instant Emails there are pre-written emails already in place for you to use as a template ( or just leave them, it’s your choice ).
Your members will also have the ability to customize their own Instant Emails and Auto responders if they wish to do so. ( for the more savvy members )
You will need to first log into your Home Office Pro admin panel located at https://admin.platinumsynergy.com/ you will be given your admin panel username and password when you launch your website. If you are unsure of your username and password please contact us at support@platinumsynergy.com and we will assist you in retrieving it.
Once you are inside your admin panel you will see a box that looks similar to this:
Click on Edit Instant Follow-Up Emails and you will see a list of all of the Instant Emails used for each one of the outcomes listed here
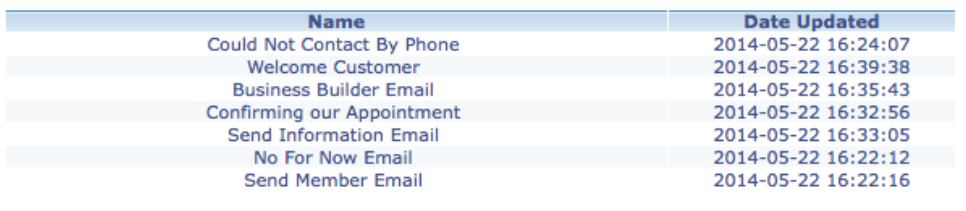
By clicking on any one of these emails you may modify the Name, Subject and of course the content of the emails.
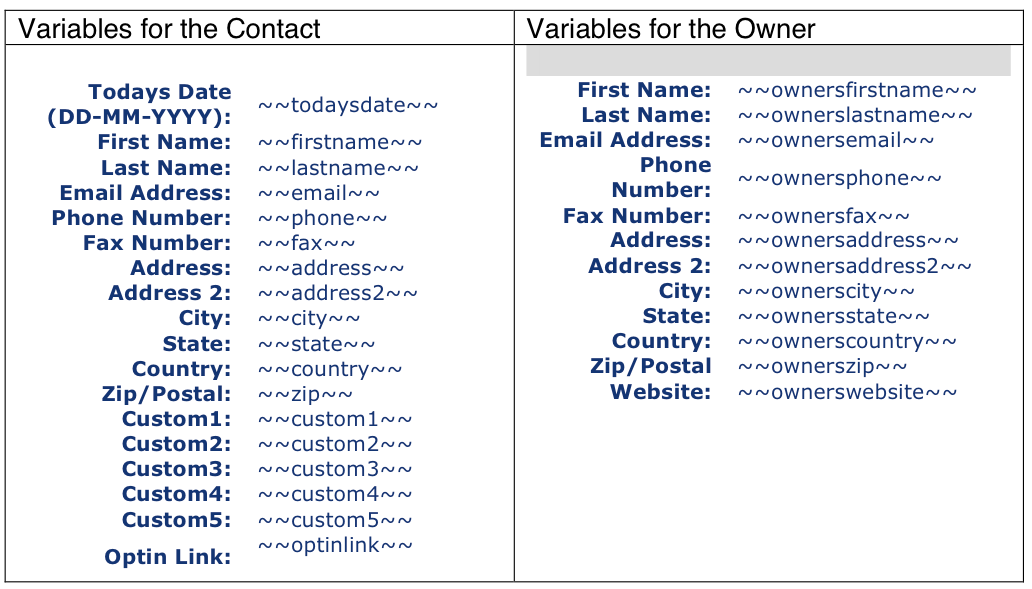
Replacement Variables for Instant Emails:
You may choose to use replacement variables in your Instant Emails to automatically plug in the prospects info, event info, and your information.
|
Prospect Variables |
Owners Variables |
Event Variables |
|
~~name~~ |
~~ownersname~~
|
~~appointment-subject~~
|
Example of an Instant Email
Customizing your Auto Responders in Response Magic
Customizing your auto responders is an optional step out of the gate, your system will function without them, but any good marketing system does have good auto responders so please keep that in mind.
Your Admin account for Home Office Pro will act as the master set of auto responders for all of your members. So be sure when modifying these letters that you use replacement variables instead of your own personal details.
To edit your Auto responders you will want to click on Marketing![]()
Then click on  to log you into your master Response Magic Account
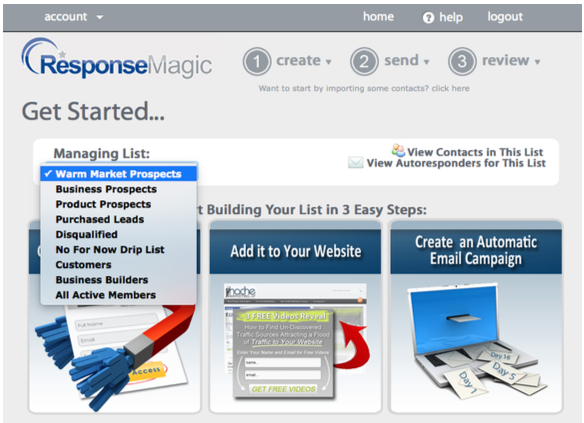
Once you are logged in you will see a drop down called Managing Lists, at this point you would want to select the list you wish to modify then click on ![]()
**Note: These are the same lists found inside of Home Office Pro, for a list of what these lists are used for please reference the list section of this guide.
For a detailed training on how to add auto responders watch this video https://support.platinumsynergy.com/entries/23508838-How-to-View-update-edit-customize-your-auto-responder-emails
Response Magic Replacement Variables
Just like the Instant Emails Response Magic has Replacement Variables which allow you to customize the letters to the prospect from the member. This is very important because this Master set of auto responders will be copied across to all of your members, making your letters dynamic using these variables will plug in your member’s and their prospect’s contact details into each email.
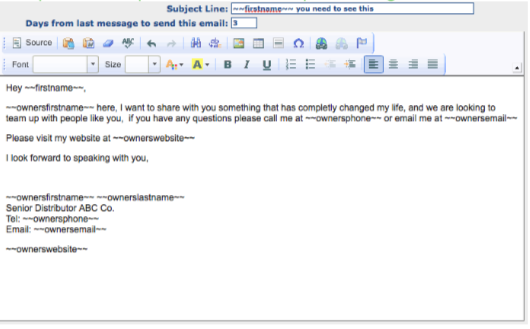
Sample Auto responder Email in Response Magic
How to add warm market approach emails for the warm market wizard
Creating your Front-end Lead Capture Pages
In this video we are going to show you how to create network marketing lead capture pages for anyone in your team to share and get leads.
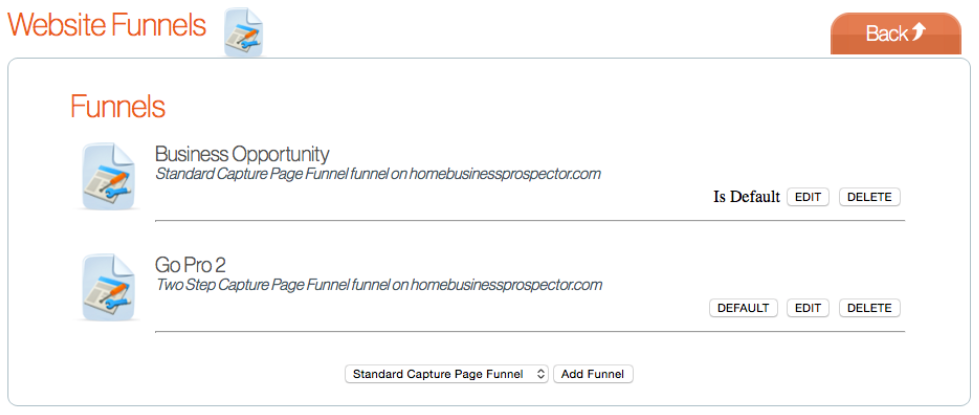
Home Office Pro is now equipped with a Website Funnel creation tool, which will build you a completely responsive lead capture page for use with your system. This saves you time and money, as you no longer need to contract a designer/programmer to build you your websites. You can create an unlimited amount of sales funnels, which can be used for Business, or Product focused leads.
To access your website funnels please click on My Settings ![]()
Then click on  you will then see an icon called marketing Websites
  click on to add your first funnel.
Once you are on this page you will have the option to choose from one of the templates which have been designed for you to use and modify.
** Home Office Pro will be continually adding new options here over time.
To create your first page choose one of the templates from the drop down and select Add Funnel

Home Office Pro will build you a Website Funnel from our template for you to be able to modify and customize for yourself. Next click on the Edit button to the right of the funnel you wish to modify.
Defining your Website Settings
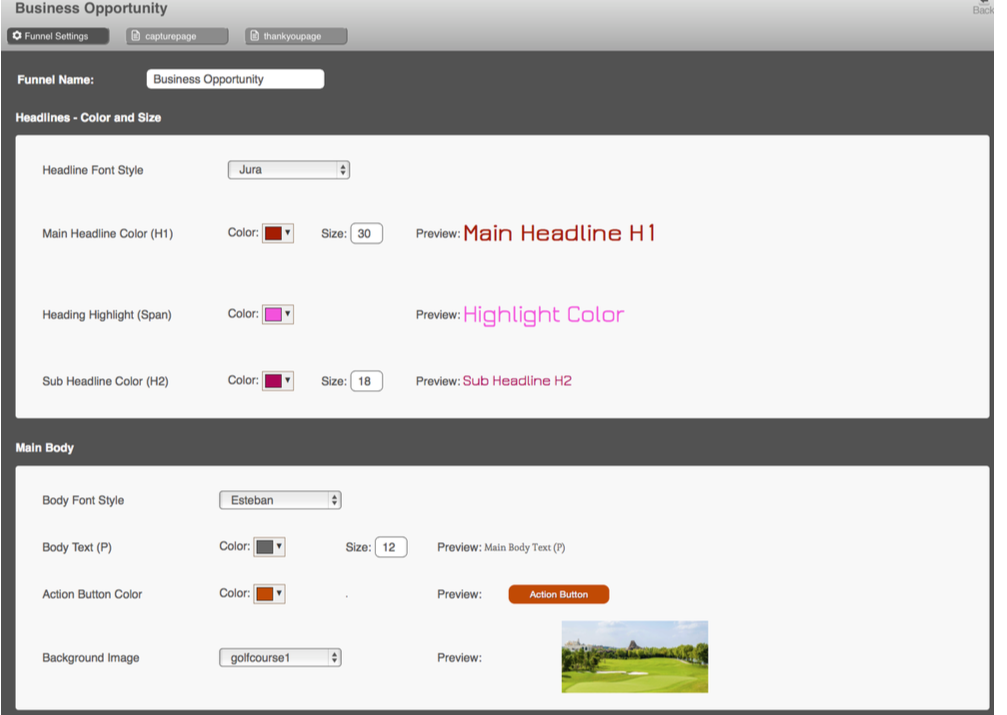
This first page that comes up when you enter into the Funnel Editor is the Funnel settings page.
This page allows you to define the Name of Your Funnel, as well as all of the Fonts, Colors, Background Image and Button Color used for all of your pages
Modifying each page in your Website Funnel

Across the top of the editor you will see a listing of all of the pages in your funnel. This is unique to the template you have chosen. Select the page in which you wish to edit the content for. Changes made here are live instantly and are ready for you and your team to use.
Next you will see a preview of your page come up on the screen with all of the content listed across the top. You can now modify the content and see it change in real time down below.
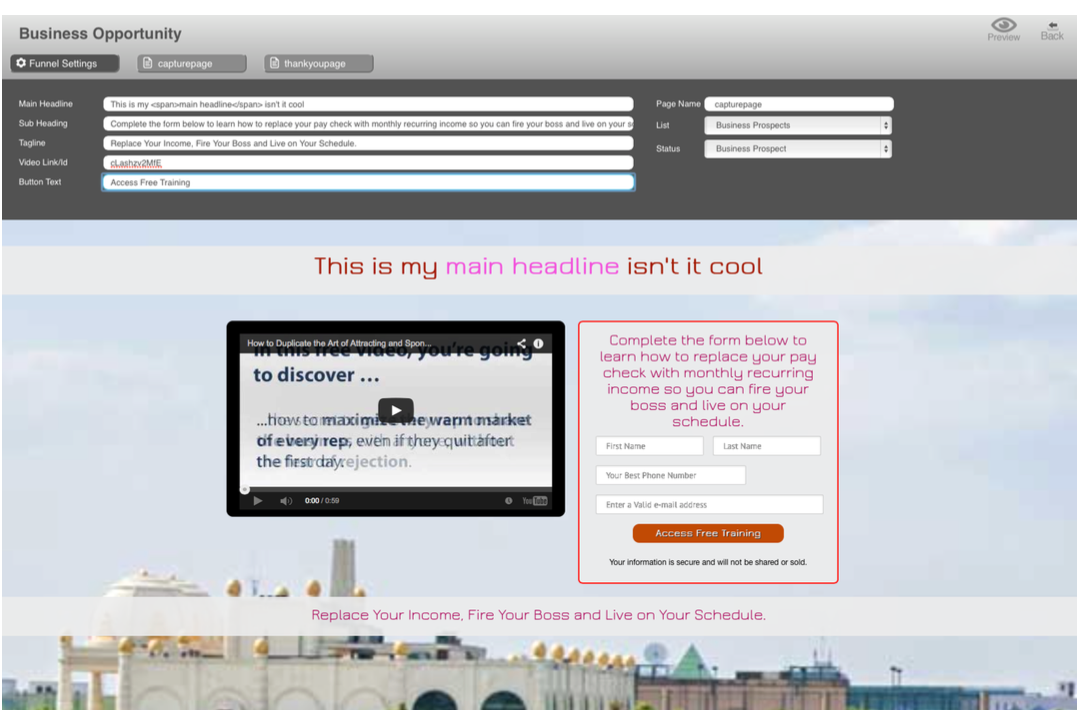
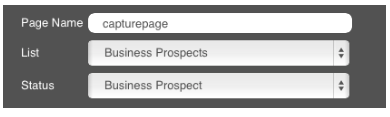
On this page you can define the page name, right now this page is called “capturepage” you can modify this page to what ever you would like, as it will show up on your domain like this.
https://www.yourdomain.com/capturepage?username
The bold highlight above represents the name you have chosen.
The green highlight above represents the username of the member who’s site this is.
On this page you also define what List and Status you wish for New Prospects coming through this funnel to be added to. ( See List and Status Section of this article to help determine what is best for your sales funnel )
How to add a list for your members
To access your website funnels please click on My Settings ![]()
Then click on you will then see an icon called marketing Websites click on to add your first funnel.
Once you are on this page you will have the option to choose from one of the templates which have been designed for you to use and modify.
click to edit one of your lead capture pages

then click on the capture page.

Then click to add the list

How to turn your capture pages into simulated live webinars
Getting Started Checklist and Team Center Content
In this video we are going to show you how to use the HomeOfficePro Network Marketing Training Software to add content and videos for your team inside their members area.
To Modify the content of your Getting Started Checklist or Team Center Resource Pages content you must access the Content Management System by clicking on
My Settings![]()
Then click on Admin Settings
you will then see an icon called Content Management System click on
to add start adding content.
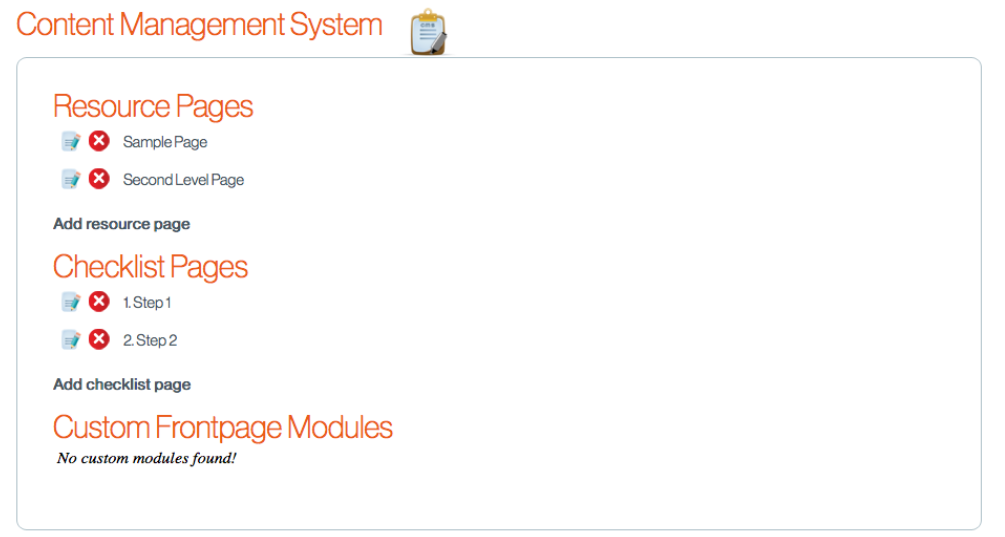
Adding Team Center Resource Pages
Add a Team Center Resource by clicking on “Add resource page”
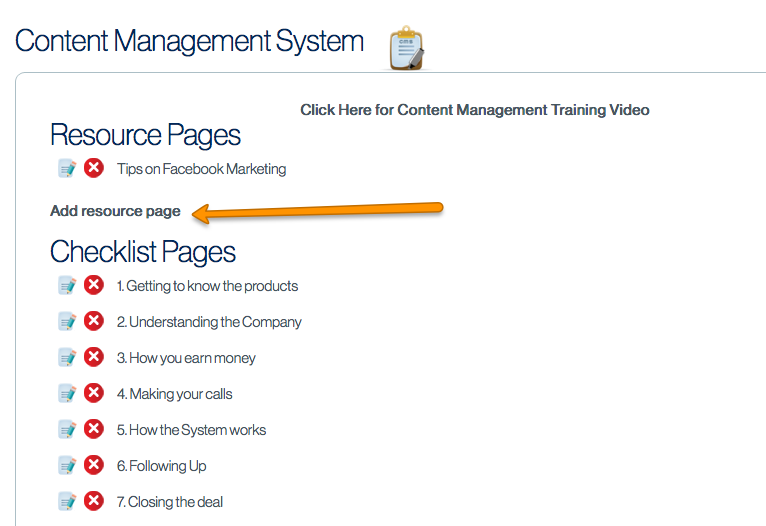
It will bring you to the add resource page

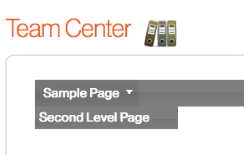 You can Label the page by setting the title. And you can choose if the page is a Top level page or if it should be added to a drop down underneath another top level page Example ->
The Content Type allows you to select if its an internal page ( created by this editor ) or an outside link you wish to link or document.
All of your content will show up in the Team Center ( located across the top )
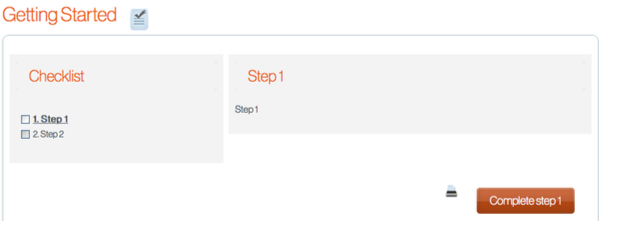
Adding Getting Started Pages
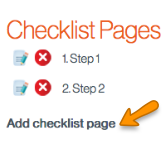 Adding Getting Started Pages is very similar to adding team resource content except these pages are in a sequential order. Click on “Add checklist page” to get started
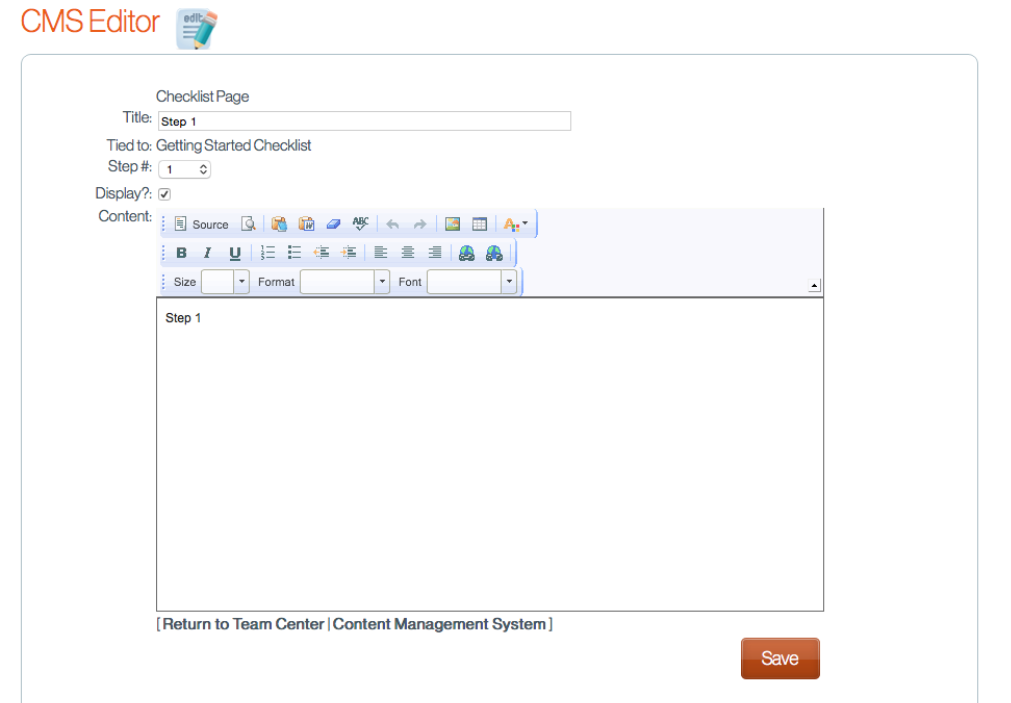 The difference between a checklist page and a resource page is that you get to select the order in which this page will be displayed in the checklist.
 Now you can find your Getting Started Checklist Across the top of the page
Here is what the page looks like to the member before customization: